
Get Started With Advanced Custom Fields in Wordpress
Seb Toombs
Feb 17 2019 ()
11 min read
How To Use Advanced Custom Fields (ACF) in Wordpress
Out of the box, Wordpress is a really easy to use, simple blogging platform. What gives you the ability to turn Wordpress into a full-on CMS (content management system) and run just about any type of website is its powerful and flexible plugin system. One of the best plugins to help you do that is Advanced Custom Fields (ACF).
ACF is without a doubt our most used plugin for Wordpress sites. (If you're interested in some other plugins we use all the time, check out our post about our top 10 Wordpress plugins). I don't think there's a project I have worked on where Advanced Custom Fields isn't installed. In case you hadn't guessed from the name, ACF allows you to add custom data fields to just about any object in your Wordpress install. This is great when you are building or customising a theme and need finer control over the data attached to each object (post, page etc) than simply the title and content.
We're going to go through some of the field types here in a little detail. If you just want to see how to use ACF, you can skip to here.
Types of ACF Fields
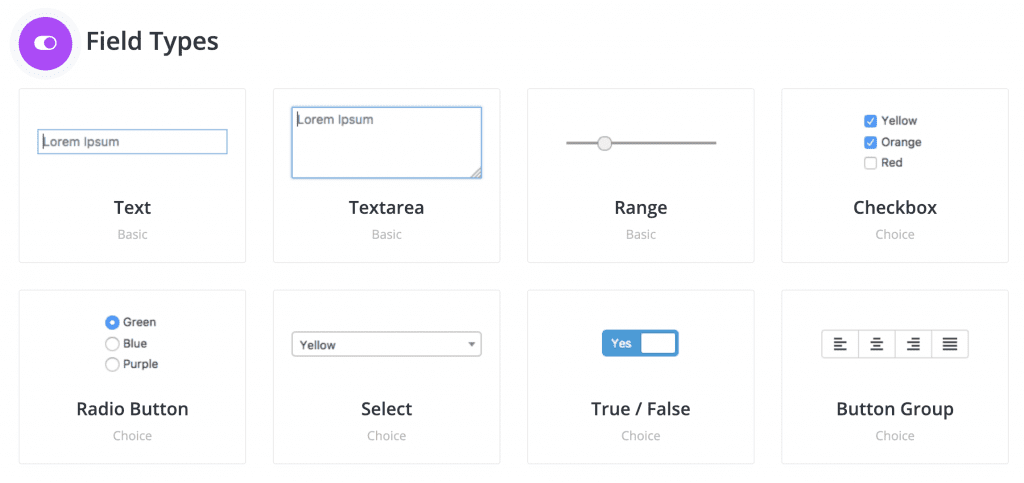
Before we get started, let's take a quick look at the types of field you can add to posts using ACF. There are a huge number of types of field you can add using ACF, and even more available through add-ons and extensions. The ACF documentation is a great resource for info on how to use it, and what fields are available. We'll quickly look into some of the more commonly use field types.
Text
The text field is the most basic field you can add to a post with Advanced Custom Fields. It will accept a string of text or HTML, and can be configured to limit the length of the content, append or prepend text to the output and a few other features. You'll use this field really often, so it's worth being familiar with. The text field returns simply the text entered (with any modifications you have specified) and can be printed out to the screen.
Image
The image field is really easy to use and uses the built in Wordpress media library functions and image selector. The image field can either return an array of image data, or the chosen image ID. The array of image data contains pretty much all the information that exists about the image, so it is really useful. Check the documentation for details on how to use it.
Gallery
The gallery field works in much the same way as the image field, but it lets you select multiple images to make up a gallery. You can change the order of the images to suit by dragging them into the order you like. My only complaint about the gallery field type is that it would be really helpful if you could add a caption to images that is not the same as the caption that is stored against the image in the media library. This would be useful if, for example, you wanted to use the same image in two galleries with a differing caption.
Link & Page Link
The link and page link field types are ways of linking to some other content. The link field is exactly the same as the link editor you use in the normal Wordpress content editor and allows you to specify a URL, title and target. The page link field is slightly more restrictive and only allows you to select a page or post (or custom post type) from within your site and will return the URL for that.
Post Object
The post object field type allows you to select one or multiple posts and returns an array of all the post data. This is really useful in conjunction with a repeater field to do things like show some related posts.
Repeater
The repeater is one of a couple of field types that are reserved for users of the pro version of the plugin. It is one of the field types that I use most commonly, however, and is one of the reasons I think ACF pro is worth the purchase! The repeater basically allows you to have a group of fields that can be repeated multiple times. Let's take my complaint about the gallery field type from above, where we'd like to have a gallery with a caption for each image. We could use a repeater which has an image field and a text field inside it. Then we can add rows to the repeater for each image and it's caption in our gallery. This type of functionality is really great when you need to allow for repeatable content but you don't necessarily know how much content there will be. If the concept is still a little unclear, read on to our example below.
Flexible Content
The flexible content field is another field, like the repeater, that is reserved to the pro version. I'm not going to go into too much detail here on the flexible content field, but it is really really powerful. It works a lot like the repeater field, except instead of each row being the same (e.g. image, text to use the example above) you can specify different presets that can be applied. For example I might have a row that is image & text, but the next row is a post object. It's really useful, and can be great for building more complicated layouts like home or landing pages.
Get Started
Ok, that's enough about the field types, let's get straight into some examples of how to use them!
Install ACF
If you haven't done so already, install the Advanced Custom Fields plugin. You can find it by heading into your Wordpress admin, plugins, add plugin and search for ACF. Alternatively you can download it from https://wordpress.org/plugins/advanced-custom-fields/ however I highly recommend heading over to the ACF site and purchasing the pro version. Pricing is AU$25 for a single site or AU$100 for unlimited sites and it's well worth it.
1. Getting Started + Basic: Text
We'll start off with a really simple example to get going: adding a text field to a post. There are three parts to any ACF setup; 1) Configure your custom fields and settings in the admin panel, 2) set up your template (front end) to use your newly configured custom fields and 3) put some data in your custom fields. So we'll start off at the beginning and configure some custom fields.
Start by logging in to your Wordpress admin, then in the menu find Custom Fields and hit Add New in Field Groups. Custom fields are organised by group, and the rules for what post types etc to show the fields on are set per group. Once you've hit Add New you should see something like this.

Although not necessary, we're going to start by setting a title.
Next, we're going to add a field. Click Add Field, and set a the Field Label. In this case we're going to create an Alternative Title for the page so that's what we've called the field. Each field needs to have a unique slug, just like a post. ACF will create the slug for you from the label if it's empty, so in this case ACF has given us "alternative_title" and we're going to leave it that way. Finally we need to choose the Field Type. In this case we're using a text field so go ahead and choose that (text should be the default option anyway).
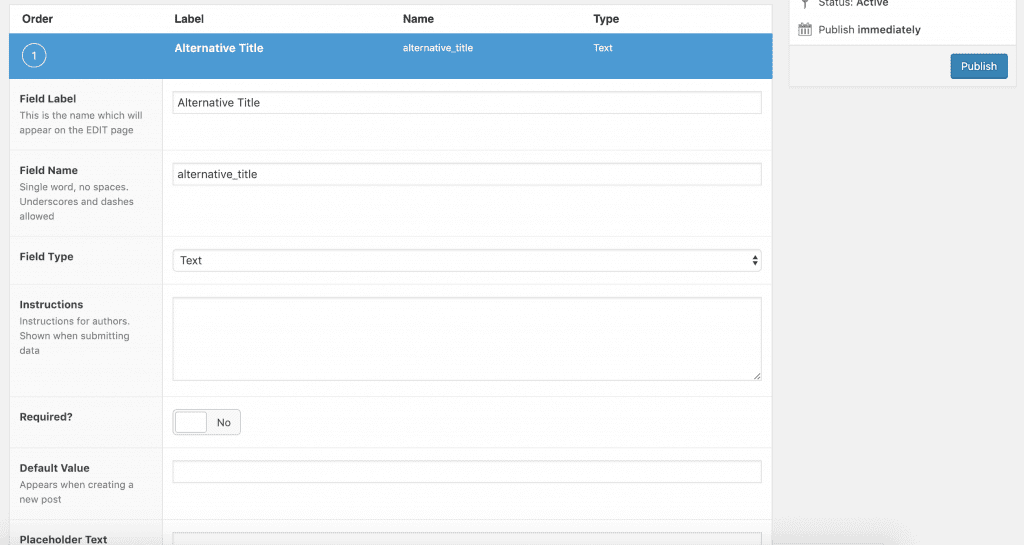
There are quite a few other settings that we could set, such as some instructions that are shown to authors when setting the content, setting the field to required, setting a default value and so-on. For now we're going to leave these as default, but feel free to have a look through and change any that you want.
Scroll down to the Location meta box. This is where we can set the rules that determine what post types, pages, etc that this field group will show up for. We want this field group to show up on normal posts, so we're going to set Post Type equal to Post.

There is a final Settings meta box below that controls a few general settings for the field group, however for most cases the defaults will do. Leave the default settings here and hit Publish.
Next we need to set a value for our custom field so we can test. Find a post you can edit, and jump in to the editor. You should find a meta-box with the title of the field group you created in the previous step. We named ours "Test". (We're using WP5/Gutenberg so our meta-box is below the gutenberg editor area).

Enter a value for your Alternative Title and save your post. We're done in Wordpress for now, so fire up your favourite editor so we can edit theme files (or edit them via the Wordpress appearance editor if you're a savage like that...)
Which file to edit will depend on your theme. We want to edit the file that shows the single post title. In our case our theme uses single.php which then loads template-parts/content.php. The line we're looking for is the_title which is the wordpress function that prints the post title. In our case our code looks like this;
<?php
//template-parts/content.php
?>
<article <?php post_class(); ?> id="post-<?php the_ID(); ?>">

    <header class="entry-header">

        <?php the_title( sprintf( '<h1 class="entry-title"><a href="%s" rel="bookmark">', esc_url( get_permalink() ) ), '</a></h1>' ); ?>

    </header><!-- .entry-header -->

    ...

</article>
Let's start very simply by refactoring this bit of code to make it accept our alternative title. We're going to take the h1 and a tags and wrap them around the the_title call.
<article <?php post_class(); ?> id="post-<?php the_ID(); ?>">

    <header class="entry-header">

        <?php
        //Print the opening H1 and anchor
        echo sprintf( '<h1 class="entry-title"><a href="%s" rel="bookmark">', esc_url( get_permalink() ));
        //Print the title
        the_title(  );
        //CLose the anchor and H1
        echo '</a></h1>'
        ?>

    </header><!-- .entry-header -->

    ...

</article>
Ok, with that done, quickly view your post; it should all look the same. Check the source to make sure.
Now for the fun part, this is where we are actually going to use ACF. The primary function provided by ACF is get_field. Get field is a powerful and flexible function that takes one required parameter: the field slug. Using our example, we will call get_field('alternative_title'). We're going to store the value returned from get_field in a variable called $alternative_title. Lastly we'll check whether an alternative title has been set, and if so, print it. Otherwise we'll print the original title.
<article <?php post_class(); ?> id="post-<?php the_ID(); ?>">

    <header class="entry-header">

        <?php
        //Get the alternative title
        $alternative_title = get_field('alternative_title');
        //Print the opening H1 and anchor
        echo sprintf( '<h1 class="entry-title"><a href="%s" rel="bookmark">', esc_url( get_permalink() ));
        //Print the title
        if($alternative_title && !empty($alternative_title)) { //If the alternative title has been set, use that
            echo $alternative_title;
        } else {
            the_title(  );
        }
        //CLose the anchor and H1
        echo '</a></h1>'
        ?>

    </header><!-- .entry-header -->

    ...

</article>
And that's it! Save your file, upload to your webserver (if running remotely), and refresh your post in the browser. You should see your alternative title in place of the post title.


2. Basic Image
Next we're going to look at adding an image to a post. Note that realistically this is probably a waste of time as we could use the built in featured image, but just like the title, maybe we want an override for some reason.
Let's start by configuring our custom field. Edit your field group and add a new field. We're going to call it Alternative Image and set the slug to alternative_image. The important extra step here is to select Image for the field type.

There is one other configuration field of interest here, the Return Value. The text field type can only return text, so that's easy. The image field can return an array, the original URL of the image, or the image ID. We're going to use the array as that gives us the most flexibility. We could use the URL, however we lose the ability to use Wordpress' image sizes and can't necessarily serve the best image to the user.

Click Update and save the field group. Next we need to set a value for the field so we can test. Jump back to your post editor (refresh it to see the new field if you already had it open).

Select an image to use by clicking Add Image and either uploading or selecting one from your media library. Once you've done that, save your post and jump back in to your editor. We need to again look for the file that outputs a single post. We're going to print out the alternative image below the heading, but this time we're going to ignore whether a featured image has been set. Start looking in single.php. Again, in my case, single.php loads template-parts/content.php so that's where we'll be working.
...

</header><!-- .entry-header -->

<a class="post-thumbnail" href="<?php the_permalink(); ?>" aria-hidden="true" tabindex="-1">
    <?php
    the_post_thumbnail( 'post-thumbnail', array(
        'alt' => the_title_attribute( array(
            'echo' => false,
        ) ),
    ) );
    ?>
</a>

<div class="entry-content">

...
In our template, we've got an anchor that is wrapping the post thumbnail function. What we're going to do is add our alternative image after this.
The simplest way to print out the image HTML (and use responsive images!) is to use Wordpress' built int wp_get_attachment_image. Fortunately ACF works really well with this.
...

</header><!-- .entry-header -->

<a class="post-thumbnail" href="<?php the_permalink(); ?>" aria-hidden="true" tabindex="-1">
    <?php
    the_post_thumbnail( 'post-thumbnail', array(
        'alt' => the_title_attribute( array(
            'echo' => false,
        ) ),
    ) );
    ?>
</a>


<?php
//Get the image field
$image = get_field('alternative_image');
$size = 'full'; // (thumbnail, medium, large, full or custom size)

if( $image ) {
    //Print the image HTML (responsive)
    echo wp_get_attachment_image( $image['ID'], $size );
}

?>


<div class="entry-content">

...
Save your code, upload and refresh your post. You should see your alternative image! Easy as.
Summary
ACF can completely change the way Wordpress can be used to manage website content. Hopefully this guide on how to use Advanced Custom Fields has helped you learn! The ACF website has some great examples on how to use the various field types, as well as a list of code examples, so don't forget to check that out as well.